HOWTO: Make iPhone / iPad (IOS) Use Your Own DNS Server or DNSBL Like Pi-Hole, void-zones-tools, or pfBlockerNG by ByPassing iCloud Private Relay for DNS

So you want to use your own DNS server on your iPhone or iPad. Maybe your dns server is also a dnsbl (DNS Blocklist or DNS Blacklist) that you use to block unwanted ads, telemetry and malware. This might be something like Pi-Hole, PFBlockerNG, or void-zones-tools. Maybe you are even running void-zones-tools on OpenBSD as I describe in the HOWTO here.

Whatever your DNS server you want to use it, and you are having trouble because for some reason your iPhone doesn’t seem to be using your DNS server. Even though your DHCP server hands out the right DNS to the phone it still seems to bypass it. You see your DNS server listed properly in the Wi-Fi configuration in the iPhone, but nevertheless it is no being used. You are still seeing ads, and resolving sites you shouldn’t be.

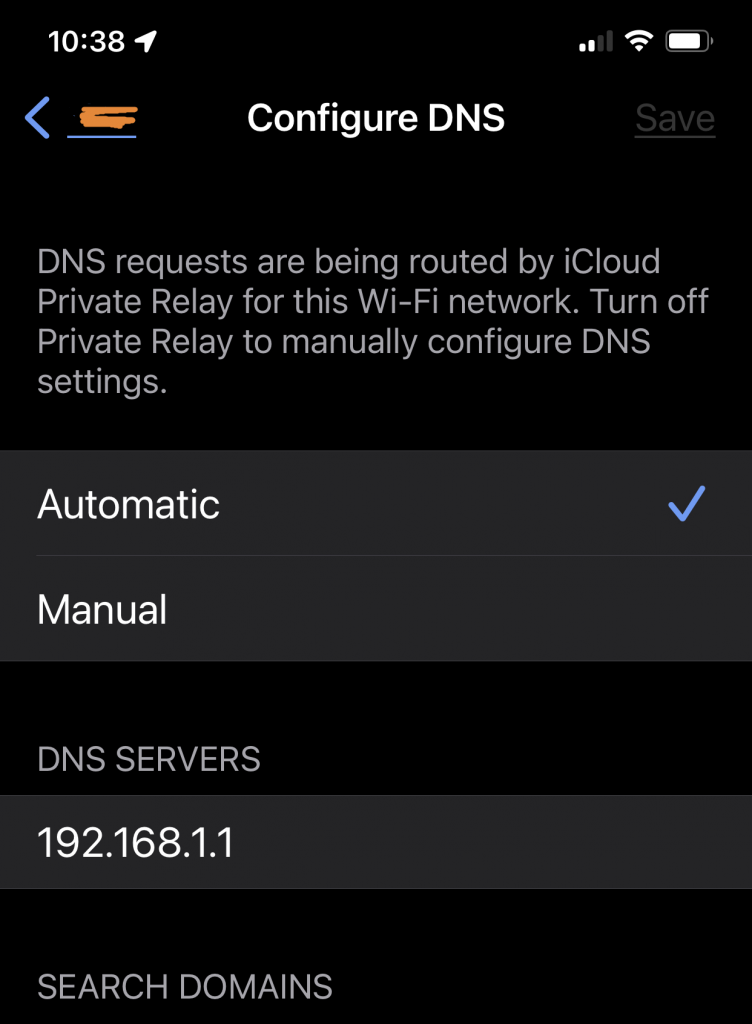
It seems at some point Apple decided to helpfully forward DNS through iCloud. Have a look at Setting->Wi-Fi and tap the little blue letter I in the circle next to your Wi-Fi network. Scroll down under DNS and tap on Configure DNS. This brings you to the following screen:

Note that it has a warning that:

“DNS requests are being routed by iCloud Private Relay for this Wi-Fi network. Turn off Private Relay to manually configure DNS settings.”

The annoying this that Private Relay is indeed turned OFF. So this phone is still routing DNS through iCloud even though Private Relay is turned off. We need to bypass Private Relay for DNS. Luckily there is a way!

Apple has a document describing Private Relay here. The specific part we are concerned with is here:

This same technique can be used to prevent DNS being routed through iCloud even when Private Relay is turned off. We just need to use our trusty DNS server to return NXDOMAIN for those offending addresses and Apple will butt out of our DNS!

(Note that I am fairly certain this will also disable Private Relay completely. So if you actually need Private Relay and don’t have your own VPN this may not be the best solution for you. But if you are running your own DNS server chances are you at least somewhat know what you are doing and can cogently evaluate this on your own.)

How you fix this is dependent upon which DNS server you use.

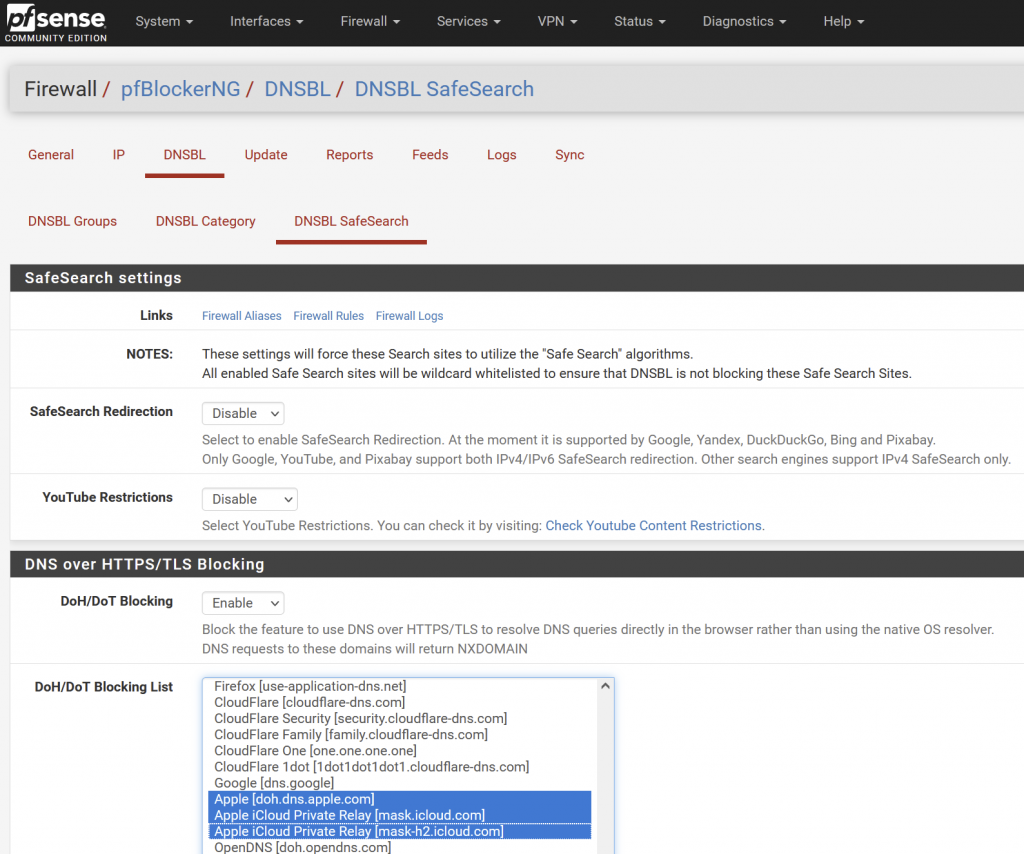
In order to fix this under pfBlockerNG (a dnsbl that runs on pfSense):

Be sure to Enable DoH/DoT Blocking and then select the Apple servers as shown. Note the additional server doh.dns.apple.com I believe will block HTTPS dns requests on the Mac from going to Apple and force those to use your local server instead. Enable if you wish, though it is not required to fix the issue.

To fix this with void-zones-tools:

Edit your /usr/local/etc/void-zones/my_void_hosts.txt file and add the following entires under #blac klist:

#black list 

0.0.0.0 mask.icloud.com
0.0.0.0 mask-h2.icloud.com

Re-run void-zones-tools.sh and restart unbound. (If you are running void-zones-tools I assume you know how to do these things. If you have forgotten check your crontab, because you would have set them up in there to keep the lists up to date.)

To fix this under Pi-Hole:

(Note I do not run Pi-Hole. This info is taken from the following link. YMMV)

Create a file /etc/dnsmasq.d/xx-NXDOMAIN.conf , (replace xx with an unused number). Put the following lines in that new file:

server=/mask.icloud.com/
server=/mask-h2.icloud.com/

Then restart pihole-FTL (sudo service pihole-FTL restart).

To fix this with any other DNS server:

Just configure your server to reply with an NXDOMAIN for those two addresses:

mask.icloud.com
mask-h2.icloud.com

When the iPhone / iPad see this it will use your own DNS server, bypassing iCloud Private Relay for DNS.

Conclusion

Apple has made the unilateral decision to slurp up everybody’s DNS queries in the name of security. (Granted, they do handle it a pretty decent way, as opposed to say, Google’s 8.8.8.8, etc.) Most nerds want to use their own DNS servers for a myriad of reasons. This articles describes how to make IOS use your own DNS on an iPad or iPhone by disabling Private Relay for DNS.

Posted in Uncategorized | Tagged , , , , , , , , , , , , , , , , | Leave a comment

HOWTO: Setup void-zones-tools dnsbl DNS Blocklist (like Pi-Hole) on OpenBSD

I like to use DNS blocklists to block ads, telemetry, and potential malware. Things like Pi-Hole have been popular for a while. If you search you can also find lists to block “offensive” website domains as well, such as adult sites.

There is a similar tool called void-zones-tools which is designed around FreeBSD. The void-zones-tools project includes a number of DNS blocklists, and there is a method to add additional blocklists (I demonstrate one way below in the cron section).

The default repository doesn’t quite run out of the box on OpenBSD. However, after a few simple changes you can get it working a treat!

First download the void-zones-tools zipfile from GitHub (or use git to pull it if you prefer– all of this is covered in the README on GitHub).

>  ftp https://github.com/cyclaero/void-zones-tools/archive/refs/heads/master.zip

Expand the zip:

>  unzip master.zip

Edit the Makefile for compilation on OpenBSD

We need to modify the Make file to enable Position Independent Code for OpenBSD:

>  cd void-zones-tools-master
>  sed -i 's/-fno-pic/-fPIC/g' Makefile

Then we can compile as usual:

>  make

Modify the script to use ftp instead of fetch for OpenBSD

The void-zones-tools update script ( void-zones-update.sh ) tries to find the fetch program, which is FreeBSD’s equivalent of the multipurpose downloader called ftp on OpenBSD (similar to wget or curl). For the purposes of void-zones-tools you can use OpenBSD’s ftp in place of fetch. You can edit the void-zones-update.sh (installed in /usr/local/bin by default) and set the FETCH variable to point to /usr/bin/ftp as well as delete or comment out the checks for fetch like this:

...

#### verify the path to the fetch utility
#if [ -e "/usr/bin/fetch" ]; then
#   FETCH="/usr/bin/fetch"
#elif [ -e "/usr/local/bin/fetch" ]; then
#   FETCH="/usr/local/bin/fetch"
#elif [ -e "/opt/local/bin/fetch" ]; then
#   FETCH="/opt/local/bin/fetch"
#else
#   echo "No fetch utility can be found on the system -- Stopping."                                                                                 #   echo "On Mac OS X, execute either 'sudo port install fetch' or install"
#   echo "fetch from source into '/usr/local/bin', and then try again."
#   exit 1
#fi

# Set FETCH for OpenBSD
FETCH="/usr/bin/ftp"

...

Or you can simply make a symlink for fetch that points to ftp :

#  ln -s /usr/bin/ftp /usr/bin/fetch

Either way works. OpenBSD purist may prefer to modify the script rather than create the symlink.

Install

Then install as root.

#  make install

Execution and Auto Update Configuration

** The following section is lifted from the README of the original void-zones-tools package with modifications to paths and command names to make it OpenBSD specific. These instructions use GNU nano as the editor. You can of course replace that with vi or emacs, etc.

The tools are placed by the above command sequence into /usr/local/bin .

On the first run of void-zones-update.sh, a directory is created at /usr/local/etc/void-zones/, which serves as the storage location for the downloaded Hosts files and/or Domain listings. In addition a template for a custom white/black list my_void_hosts.txt is placed into that directory, and this may be used for whitelisting some zones that are inadvertently part of the downloaded Hosts files, or for blacklisting additional zones, which are missing from the downloads. Now execute the void-zones-update.sh shell script:

# void-zones-update.sh

You can look at the customizable file my_void_hosts.txt:

# nano /usr/local/etc/void-zones/my_void_hosts.txt

# white list
1.1.1.1 my.white.dom

# black list
0.0.0.0 my.black.dom

For whitelisting use the IP address 1.1.1.1, and for blacklisting 0.0.0.0 shall be used. This /usr/local/etc/void-zones/my_void_hosts.txt file is where you would add any personal exceptions to the downloaded rules, like whitelisting specific sites that don’t work correctly if blocked, or blacklisting sites not covered by the downloaded rules, etc.

The downloaded Hosts files are placed into /usr/local/etc/void-zones/ as well:

# ls -l /usr/local/etc/void-zones

total 1876
-rw-r--r--  1 root  wheel   13722 Jan 31  2017 away_void_hosts.txt
-rw-r--r--  1 root  wheel  640858 Aug 17 19:16 jdom_void_list.txt
-rw-r--r--  1 root  wheel   36982 Jun 29 19:52 mdl_void_hosts.txt
-rw-r--r--  1 root  wheel  497673 Aug  7 11:07 mvps_void_hosts.txt
-rw-r--r--  1 root  wheel   60257 Aug 21 05:43 pgl_void_hosts.txt
-rw-r--r--  1 root  wheel  376421 Aug 20 14:40 sowc_void_hosts.txt
-rw-r--r--  1 root  wheel     618 Aug 22 09:29 ucky_void_host.txt
-rw-r--r--  1 root  wheel    9977 Aug 22 09:29 w10telm_void_hosts.txt
-rw-r--r--  1 root  wheel     886 Aug 22 09:29 w7telm_void_hosts.txt
-rw-r--r--  1 root  wheel    1142 Aug 22 09:29 w81telm_void_hosts.txt

And finally the void-zones-update.sh compiles (converts & consolidates) all Hosts files and Domain listings into one single local-void.zones include file, and moves this into /var/unbound/ for direct usage with Unbound:

# head /var/unbound/local-void.zones

local-zone: "clk.cloudyisland.com" static
local-zone: "click.silvercash.com" static
local-zone: "oascentral.pressdemocrat.com" static
local-zone: "s29.cnzz.com" static
local-zone: "www.spywarespy.com" static
local-zone: "republika.onet.pl" static
local-zone: "preview.msn.com" static
local-zone: "pos.baidu.com" static
...

Configure Unbound to use the zones

For using the void zones method, of course Unbound must be up and running already on the given OpenBSD machine. Then edit the configuration file /var/unbound/etc/unbound.conf in order to activate ad, tracking, malware and telemetry domain filtering by Unbound:

# nano /var/unbound/etc/unbound.conf

Before any forwarder directives, e.g. forward-zone: or include: /var/unbound/forward.conf add the following line:

include: /var/unbound/local-void.zones

(ed note) I like to put it as shown here with some context from the default unbound.conf:

...    
    # Serve zones authoritatively from Unbound to resolver clients.
    # Not for external service.
    #
    
    include: /var/unbound/local-void.zones

    #local-zone: "local." static
    #local-data: "mycomputer.local. IN A 192.0.2.51"
...

Then restart Unbound:

# /usr/sbin/rcctl restart unbound

For future updates execute the following command sequence which may be placed into a cron job:

# /usr/local/bin/void-zones-update.sh && /usr/sbin/rcctl restart unbound

In order to facilitate inclusion of listings which are not part of the automated updating, 3 additional input files are passed by void-zones-update.sh to the conversion tool host2zones :

x_void_list.txt
y_void_list.txt
z_void_list.txt

This mechanism can be used to include for example the Disconnect.me listings to the hosts2zones processing by executing the following command before updating the other zones:

# ftp -o - \
        https://s3.amazonaws.com/lists.disconnect.me/simple_ad.txt \
        https://s3.amazonaws.com/lists.disconnect.me/simple_malware.txt \
        https://s3.amazonaws.com/lists.disconnect.me/simple_tracking.txt \
        https://s3.amazonaws.com/lists.disconnect.me/simple_malvertising.txt \
        > /usr/local/etc/void-zones/x_void_list.txt

Said command would place the respective lists joined together into /usr/local/etc/void-zones/x_void_list.txt , and on the next run of void-zones-update.sh that one would be converted & consolidated & included into the local-void.zones for filtering by Unbound. In the case these additional files are missing, the tool simply ignores these parameters.

Example cron setup for OpenBSD

Here is an example cron setup for OpenBSD. Edit your crontab for root with:

# crontab -e

Then add something like the following at the bottom:

~ 5 * * * ftp -o - https://raw.githubusercontent.com/StevenBlack/hosts/master/hosts http://sysctl.org/cameleon/hosts http://sysctl.org/cameleon/hosts http://sysctl.org/cameleon/hosts http://sysctl.org/cameleon/hosts http://sysctl.org/cameleon/hosts >! /usr/local/etc/void-zones/y_void_list.txt

~ 6 * * * /usr/local/bin/void-zones-update.sh && /usr/sbin/rcctl restart unbound

Note that the first line is all on a single line with no line breaks. You could put that in a script and run the script from cron if you want your crontab cleaner.

The first crontab entry runs sometime (randomly) within the 5AM hour and uses ftp to download a series of additional blocklists (these are not included by default and you may want to use them, especially the first one is particularly good) and concatenates them into /usr/local/etc/void-zones/y_void_list.txt , which is one of the “extra” files for customization as describe above.

The second line (remember this should be just two lines in the crontab, without line breaks) runs some time randomly within the 6AM hour and runs the void-zones-update.sh script and then restarts unbound to load the new data.

Note you may prefer to use:

/usr/sbin/rcctl reload unbound

which should force unbound to reload the configs without clearing its cache, but I have seen some occasional issues with this; YMMV.

Conclusion

Hopefully you are now about to get the void-zones-tools dnsbl blocklist (blacklist) set up under OpenBSD in order to block ads and telemetry or block malware. Someday when I have time I will submit a pull request for updates to make the master branch work under OpenBSD by default.
Posted in Uncategorized | Tagged , , , , , , , , , , , , , | 1 Comment

HOWTO Fix Artificially High Load Average on FreeBSD Running on Oracle Cloud

I noticed that my amd64 VPSes on Oracle Cloud all had load averages over 1.0. These are the free tier VM.Standard.E2.1.Micro instances.

# w
6:11PM up 5 days, 1 hr, 2 users, load averages: 1.39, 1.62, 1.41

This was with a basically idle machine. When I checked top I found nothing interesting. No processes were running constantly.

The machines in question are FreeBSD 13.0

# freebsd-version -kru
13.0-RELEASE-p7
13.0-RELEASE-p7
13.0-RELEASE-p7

I dug around in sysctl:

kern.timecounter.choice: i8254(0) ACPI-fast(900) HPET(950) TSC(-100) dummy(-1000000)
kern.timecounter.hardware: HPET

The timecounter clock source was HPET by default. I found that if I switched the clock source to i8254 the load avergaes reverted to nominal levels.

# sysctl kern.timecounter.hardware=i8254

# w
6:32PM  up 5 days,  1:21, 2 users, load averages: 0.23, 0.27, 0.63

This was the solution to fixing the high load average on FreeBSD running on Oracle Cloud VPSes.

In order to make this change permanent add it to your /etc/sysctl.conf file:

# echo 'kern.timecounter.hardware=i8254' >> /etc/sysctl.conf

Interestingly, the aarch64 (Ampere) FreeBSD 14/current machine did not have this issue.

I also tried the ACPI-fast timecounter source and it did not fix the issue. I was only able to fix the load average using the i8254 timecounter clock source.

Thanks to koobs on #freebsd for helping me figure this out.

Posted in Uncategorized | Tagged , , , , , , , | Leave a comment

HOWTO Allow Ping and Traceroute and MTR (ICMP) to Oracle Cloud Vm Instances and Generally Configure the Firewall- A Visual Guide

So you set up your Free Oracle Cloud trial, including the always free tier which give you some free VPS virtual machines ostensibly forever. Or you are migrating your business resources to Oracle Cloud, as it is slightly less evil than some other clouds.

You find that you cannot ping, or traceroute, or mtr to your Oracle Cloud VPS virtual machines. Oracle Cloud by default has a limited set of ingress firewall rules, and blocks ICMP. But you can modify those rules!

Unless you have done something special your vm instances will end up in a single subnet which has a common set of firewall filtering rules.

In order to allow ICMP just follow these steps with pretty highlighted screenshots:

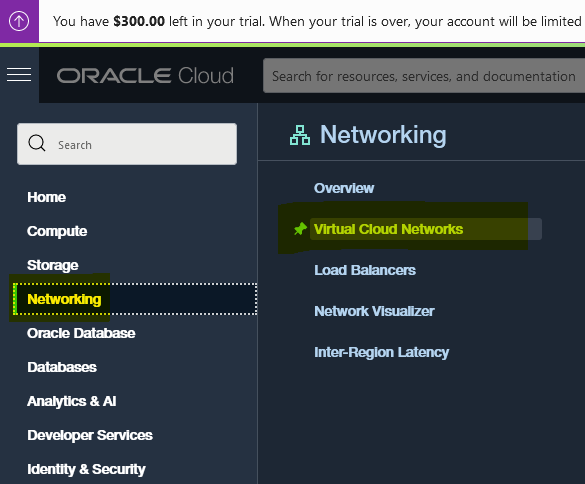
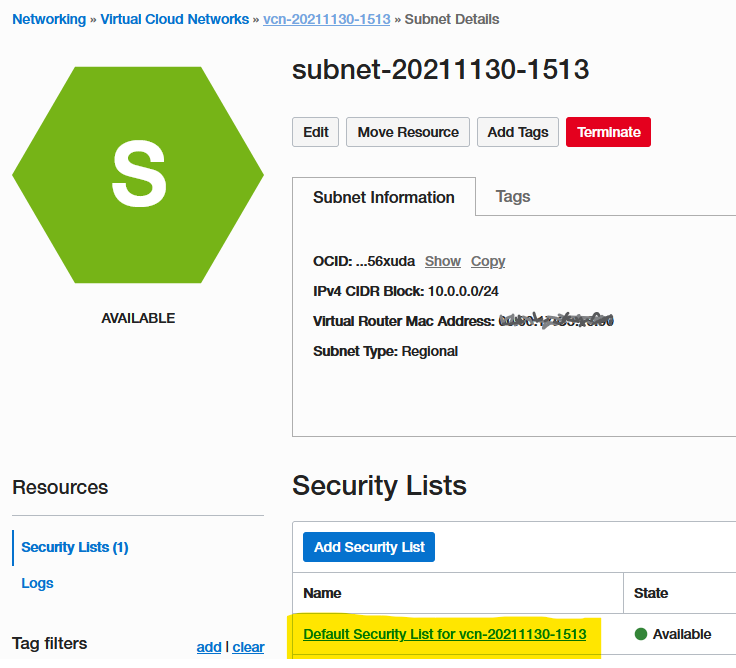
From the “hamburger”menu at the top left choose Networking->Virtual Cloud Networks.

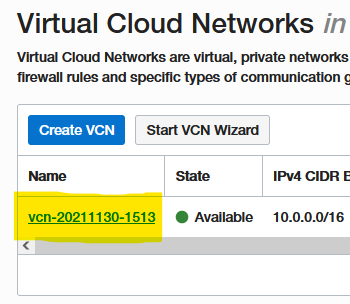
Under the Virtual Cloud Networks listing click on your vcn (which will be named differently, but in the same place as the highlighted link above).

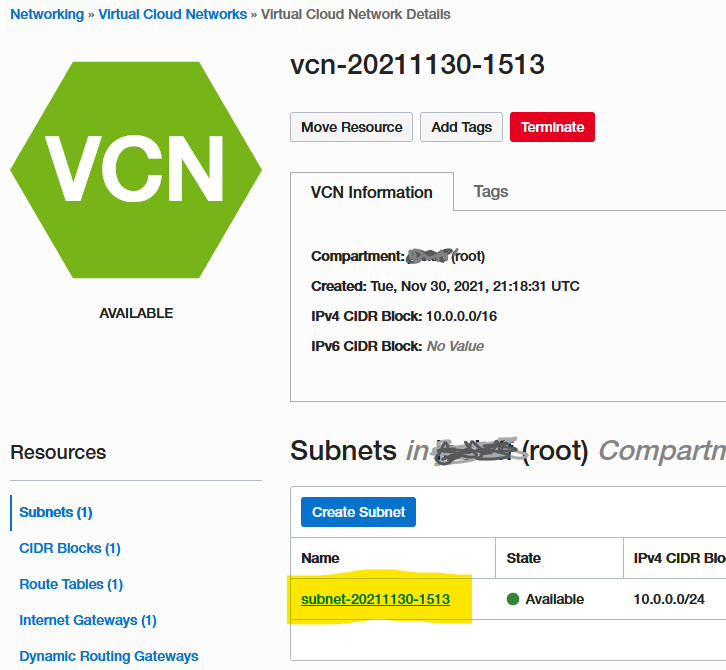
Under the Subnets listing click on your subnet (again, it will be named differently, but in the same place as the highlighted link above).

Under the Security Lists display select your Default Security List (in the highlighted location above).

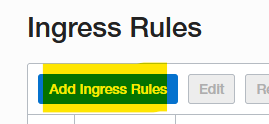
Click Add Ingress Rules to add a new rule.

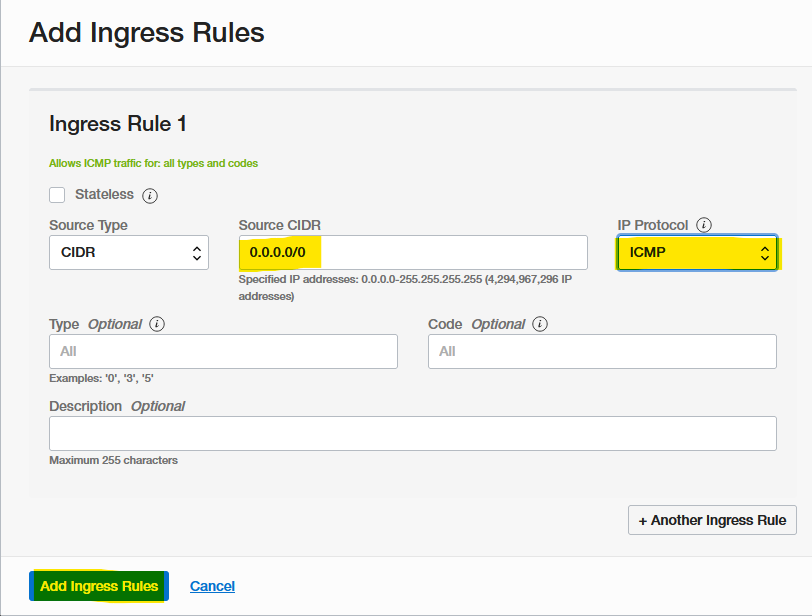
Set the Ingress Rule up as displayed above with the Source CIDR set to 0.0.0.0/0 (all hosts– or limit to your own subnet), and the IP Protocol set to ICMP (for ping/traceroute/mtr).

Click Add Ingress Rule when done.

That’s it! Now you should be able to ping or traceroute or mtr to your Oracle cloud server. This same Add Ingress Rule can be used to modify your other firewall settings to open or close specific ports, limit ssh to certain source hosts (or change its port), etc. You can adjust all your Oracle Cloud Firewall settings right here. If you want to get advanced you can create different subnets and make different rules for those subnets. I am not sure how much can be done with the free tier, but it is seems fairly powerful.

NOTE on Port 25 SMTP: By default (link and link) outbound port 25 (SMTP email) is now blocked on Oracle Cloud instances. This is a shame. Also, under the free tier I do not believe you can set up reverse DNS (PTR). So it would be difficult to use to send email anyway. You will have to send through a smart host (on, e.g. port 587) instead.

Posted in Uncategorized | Tagged , , , , , , , , , , , , | Leave a comment

Clock Offset When Running DragonFlyBSD in a VM with Bhyve under FreeBSD

When running a DragonFlyBSD system as a guest OS virtual machine under the Bhyve hpervisor running under FreeBSD as the host I ran into an issue where the clock on the DragonFlyBSD vm was way off and had to do a coarse time adjustment shortly after boot.

Dec 2 11:04:03 dragonflybsdvm dntpd[541]: issuing COARSE offset adjustment: -21598.706669s, 02-Dec-2021 11:04:03.591

This caused things like WireGuard to fail do to the large time adjustment. So WireGuard had to be restarted, which was a pain. WireGuard has trouble if the clock changes while it is running.

It turns out that DragonFlyBSD was assuming that the clock was set to local time, whereas Bhyve was setting it to UTC. Bhyve defaults to setting the clock to UTC in later versions. (This may actually be the vm-bhyve utility that has this default– see below).

The simple solution was to modify the conf file for the vm to set the clock to localtime instead of UTC.

I use vm-bhyve to manage my virtual machines. So the fix is easily achieved in the conf file for the DragonFlyBSD vm:

#other config options like cpu/memory and network settings.
...
utctime="no"
...

That’s all you have to do (do a full shutdown of the vm, and start it back up to see the change, rebooting the vm will not affect the change). Just put that line in the conf file that you use when running the vm utility from vm-bhyve.

From the manpage for vm (part of vm-bhyve):

utctime 

As of version 1.2, vm-bhyve defaults to yes for this option. This causes bhyve to try and set the guests RTC clock to UTC rather than the host's time. I consider this more consistent, and should produce the correct time in the guest as long as the timezone is correctly set. Additionally, some guests actually expect a UTC realtime clock.
  
If you require bhyve to use the host's time, as it would by default, explicitly set this to no.

So there is your solution if the time is not coming up right in your DragonFlyBSD vm. Likely some other guest OSes expect the local time as well. So this may help you fix clock offset issues with other virtual machines under Bhyve on FreeBSD.

Another Solution: Another option would be to tell the guest OS, in this case DragonFlyBSD, that the CMOS clock is set to local time, and not to UTC. This is done simply by creating the file /etc/wall_cmos_clock

root@dragonflybsd# touch /etc/wall_cmos_clock

From the DragonFlyBSD adjkerntz manpage:

...
If the file /etc/wall_cmos_clock exists, it means that CMOS clock keeps local time (MS-DOS and MS-Windows compatible mode). If that file does not exist, it means that the CMOS clock keeps UTC time. The adjkerntz utility passes this state to the machdep.wall_cmos_clock kernel variable.
...

So there you have two options to fix the clock issues on your virtual machines.

Posted in Uncategorized | Tagged , , , , , , , , , , , , , | Leave a comment

HOWTO Fix Slow Networking with a WireGuard server in a FreeBSD Jail on a VPS, and Slow Downloads in a Jail on a VPS

I was setting up WireGuard server on a FreeBSD machine (13.0) on a VPS. In this case the VPS was a Contabo VPS which uses KVM. (Edit: I just encountered the same issue with an Oracle Cloud VM Instance as well (which also used KVM).)

In particular the goal was to run a WireGuard server inside a jail on this VPS. I essentially followed this pretty nice guide on setting things up. This got everything working, but it was far from fast. An OpenBSD machine, running on a much inferior VPS was tons faster.

I determined that simple downloads with the likes of wget from inside the jail on the VPS were terribly slow as well. I was getting about 90K/sec vs. the many MB/sec I should have been getting. When I tried the same download from the VPS itself (outside the jail) I go full speed.

I tried NOT using the bridge interface as discussed in the article above. (Look for where it says,”But if you need only a single jail, it’s not necessary to use the bridge.”) I wondered if perhaps that extra layer was slowing things down. This made no measurable difference. However, since I got all the results I wanted without the bridge, I figured I was indeed better off without this extra layer.

I found that pf (and ipfw too I believe) need tso disabled in the vtnet driver in order to do NAT in kernel. So I added the following to the /boot/loader.conf on the VPS machine (outside the jail):

hw.vtnet.X.tso_disable="1"
hw.vtnet.tso_disable="1"

(Changing this file requires a full reboot of the VPS, not just the jail.) That really didn’t seem to do much either.

Then I found this posting from the mailing list archive. Here the gentleman suggested disabling lro as well. So now my /boot/loader.conf contained the following (along with anything else that had been in there before I started all this).

hw.vtnet.X.tso_disable="1"
hw.vtnet.tso_disable="1"
hw.vtnet.lro_disable="1"
hw.vtnet.X.lro_disable="1"

So this fixed my download speeds when doing a wget directly inside the jail! Everything was back to full speed inside the jail. Good progress!

However, transfers via WireGuard from the WireGuard client machine(s) were still quite slow (like around 1-2Mbps), and seemed to have some high latency like possibly some packets were dropped, though I could never see dropped packets or high latency via tools like ping or mtr.

So I decided, what the heck, let’s try disabling checksum (csum) offloading too! Now the /boot/loader.conf contained:

hw.vtnet.X.tso_disable="1"
hw.vtnet.tso_disable="1"
hw.vtnet.lro_disable="1"
hw.vtnet.X.lro_disable="1"
hw.vtnet.csum_disable="1"
hw.vtnet.X.csum_disable="1"

And with these settings on the vps (non-jail) machine and a reboot I was finally able to realize the full potential speed of the WireGuard VPN on the Contabo (or Oracle Cloud) KVM based VPS.

This is how I fixed the slow networking with a WireGuardVPN server in a FreeBSD Jail. This also fixed slow download speeds with a FreeBSD Jail on a VPS. I hope this helps someone.

Posted in Uncategorized | Tagged , , , , , , , , , , , | Leave a comment

HOWTO Fix obhttpd[1234]: parent: send server: Protocol not supported on FreeBSD

I was putting OpenBSD Httpd (obhttpd as it is known on FreeBSD) in a jail on FreeBSD 13.0. When I fired up the webserver I got the following error in the logs:

obhttpd[1234]: parent: send server: Protocol not supported

The error occurred because FreeBSD jails do not handle localhost 127.0.0.1 the same as a normal non-jailed host.

By default the obhttpd listens on all ip addresses, including localhost.

You can fix the error and get obhttpd running in a jail by adding something like this to your obhttpd.conf file (by default /usr/local/etc/obhttpd.conf ):

#specific your external ip here
ext_ip="11.22.33.44"

chroot "/var/www"

server "www.example.com" {

####### Note the listen on now listening only to the external ip, 
####### and not localhost
listen on $ext_ip port 80

location "/.well-known/acme-challenge/*" {
root "/acme"
request strip 2
}
location * {
block return 302 "https://$HTTP_HOST$REQUEST_URI"
}
}

...

Basically to fix it you configure obhttpd NOT to listen on localhost. That’s it. There are plenty of other examples out on the web if you need to figure out how to make it listen to multiple ip addresses.

Hopefully this got you back up and running quickly when encountering the “parent: send server: Protocol not supported ” error with obhttpd in a FreeBSD jail.

Posted in Uncategorized | Tagged , , , , , , , , | Leave a comment

Broken IPv6 on FreeBSD or mtr: Unexpected mtr-packet error with IPv6 on FreeBSD 13, or Other BSD Systems

This error could be caused by a number of things, but in my case it was a simple error in my ipfw rules. My FreeBSD 13 box would work perfectly for IPv4, but fail with this error for IPv6. IPv6 was broken completely for this FreeBSD 13 machine.

It turns out that I had forgotten to allow ICMP for IPv6 in the ipfw firewall.

Although IPv4 uses ARP to find out which MAC address belongs to a certain IP address. IPv6 instead uses IPv6 Neighbor Discovery. This works via IPv6 ICMP. Also, mtr likes the IPv6 ICMP available as well…

So in order to fix this you have to be sure to pass IPv6 ICMP with ipfw (or pf for that matter, but I don’t have that syntax handy– but now you know what the problem is you should be able to find it on DuckDuckGo, or that EVIL search engine).

So edit your ipfw rules, wherever they, are and include a line to pass the IPv6 ICMP:

$IPF 95 allow icmp6 from any to any

In my case $IPF is a variable set to IPF=”ipfw -q add” at the top of the ipfw script. Look at your script and see how your rules are configured and replace $IPF with whatever your script is using to call ipfw add. If this doesn’t make any sense to you then just copy one of the rule you have and modify only the latter part to match the above. I have faith you can figure out how to make it work!

The constant number 95 in my example is the rule number in my file– You will want to set this for your setup.

So this is at least one way of how to fix the broken IPv6 on FreeBSD, or how to fix mtr: Unexpected mtr-packet error with IPv6 on FreeBSD 13. Note I have also seen the mtr packet error on systems before they are fully booted. So if I mtr to a host that is in the boot up process I will occasionally get this error as well.

Posted in Uncategorized | Tagged , , , , , , | Leave a comment

Custom Routing for FreeBSD Jails – or How To Set a Unique Default Route or Default Gateway for Each Jail

I was recently configuring a FreeBSD 13.0 box to run unbound (caching DNS Resolver) in two separate jails. The machine was connected to two WANs through two interfaces. The goal was to have one unbound jail route queries to WAN A and the other unbound jail route queries to WAN B.

Important Side Note: If you want to configure unbound to do anything other than be a basic local cache you will want to install the unbound FreeBSD package and use the unbound_enable=”YES” in your /etc/rc.conf. This is different from the pre-installed local_unbound and the local_unbound_enable=”YES|NO” setting.

I opted to use FreeBSD fib support for this. See the setfib(1) manpage for more info. Basically, fib’s allow you to have independent routing tables based on the particular fib ids. So each fib can have it’s own default gateway (default route), as well as its own custom routing setups if needed. You can then run any process in the context of a particular fib routing table, or even an entire jail, as we will do here.

Note: Your kernel needs to have fibs enabled with the ROUTETABLES option. This seems to be the default in newer GENERIC kernels. I did not have to change anything on arm64 aarch64 FreeBSD 13.0.

In order to enable fibs you have to set some options in the /boot/loader.conf to load at boot time.

# echo 'net.fibs=4' >> /boot/loader.conf
# echo 'net.add_addr_allfibs=0' >> /boot/loader.conf

The first line sets the number of fib routing tables our host will have after rebooting. We really only need two at the moment, but you will have to reboot again to change later. The second line, ” net.add_addr_allfibs=0 ‘ prevents all your routing commands (and more importantly the default routing commands setup by rc.conf) from affecting ALL fibs by default. You want independent control over each fib; so this should be disabled.

Note: There have been reports that in later versions of FreeBSD (~12+) this option must be set in /etc/sysctl.conf So I added it there as well. You probably don’t need it in the /boot/loader.conf, but it doesn’t seem to hurt.

 # echo 'net.add_addr_allfibs=0' >> /etc/sysctl.conf 

Make sure the ips you wish your jails to use have been configured in /etc/rc.conf as usual (typically as aliases). Set your default router for the parent host there as well, but not for the jails which need special routing.

#/etc/rc.conf

...

# WAN A ips
# Be sure to change the ue0 to YOUR interface name
ifconfig_ue0="inet 192.168.1.10 netmask 255.255.255.0"
ifconfig_ue0_alias0="inet 192.168.1.20 netmask 255.255.255.0"

#WAN A DEFAULT GATEWAY
defaultrouter="192.168.0.1"

# WAN B ips
# Be sure to change ue1 to YOUR interface name
ifconfig_ue1="inet 192.168.2.10 netmask 255.255.255.0"
ifconfig_ue1_alias0="inet 192.168.2.20 netmask 255.255.255.0"

I my case WAN A is on 192.168.1.xxx and interface ue0 and WAN B is on 192.168.2.xxx and interface ue1. I believe that these could in fact be on the same physical interface if you desire them to be. Mine needed to be on separate Ethernets.

192.168.1.10 is the parent host’s IP on the WAN A network.

192.168.1.20 is the jail IP on the WAN A network

192.168.2.10 is the parent host’s IP on the WAN B network.

192.168.2.20 is the jail IP on the WAN B network.

We set up the default route for the parent host with the defaultrouter line. This will also be the default route for the jail on the WAN A network. Nothing extra need be done with this jail. It will work like every other jail and follow the parent host’s network routing.

We will setup the special routing rules for the WAN B jail in /etc/rc.local (or wherever you like to put your local startup scripts).

We might as well set up our routing for the jail on WAN B before we reboot. Edit or create an /etc/rc.local (or put this where ever you like to put such startup script).

# /etc/rc.local

...

# fib Routing 

# fib 0: Default
# fib 1: jail B on WAN B
# fib 2: <reserved for future use>
# fib 3: <reserved for future use>

#
# Set up the jail B on WAN B routing table
#
# Interface route(s)
# Be sure to set the iface to YOUR iface
setfib 1 route add -net 192.168.2.0/24 -iface ue1

# Default route
setfib 1 route add default 192.168.2.1

You will have to change ue1 in the example above to your interface for the second jail. Note that we use the setfib command to first configure which fib the route command will affect. So these routes are added only to fib 1, which is the second fib, and the one we are going to set our jail on WAN B to use.

Speaking of the jail. We might as well set the jail to use the correct fib routing table before we restart as well. Edit your /etc/jail.conf (or use whatever jail manager you prefer to do so) to add the following option to your jail B which is on WAN B and should get the special routing table:

 exec.fib=1; 

This tells jail to run this jail ion the context the fib indicated. For instance, your jail.conf might look something like this sample:

# SAMPLE ONLY-- change all the pertinent data
jailB {
  exec.fib=1;  #Run this jail with fib 1 routing
  host.hostname="jailB.domain.com";
  ip4.addr="192.168.2.20";
  path="/jail/jailB/root";

  # For debugging. Remove for production
  allow.raw_sockets = 1;
}

Make sure your jails are all configured and setup properly to reflect there respective ip addresses. Don’t add any routing settings in the jail /etc/rc.conf files. You would just specify the ip addresses only. In the case of my jail B this would just be something like this:

#/etc/rc.conf

...

# Be sure to change the interface and ip address to your own!
ifconfig_ue1="inet 192.168.2.20 netmask 255.255.255.0"

...

Note we also enabled allow.raw_sockets = 1; This will let us use tools like mtr (install the “nox” version to avoid all the X Windows stuff) or traceroute, etc. to work in the jail.

Note the ifconfig line has the interface name in there as well (ifconfig_ue1). Be sure to change this to your interface.

Now you need to reboot in order to make the loader.conf settings take effect. This will also make all your /etc/rc.conf settings take effect (which could be done without rebooting), but the /boot/loader.conf stuff has to be done at startup.

Assuming your parent host has jail_enable=”YES” set in /etc/rc.conf your jails should automatically start up as well. If not, service jail start should do the trick.

If you enabled raw sockets in the jail.conf you should be able to log in to your jail B on WAN B and do a traceroute or use mtr to see that your packets from this jail use the new routing you set up for fib 1. You can disable raw sockets once you get everything working.

Hopefully everything should be working at this point. You will now have a separate default route / default gateway for each jail you wish to configure.

Obviously if you want to run unbound jails like I have you will have to configure each unbound with the correct ip address, and access lists, etc.

I also put the FreeBSD void-zones package on mine in order to also block ads and telemetry at the dns level (similar to Pi-Hole, but with no GUI). It is working quite well.

If you have difficulty, or spot a mistake, feel free to leave a comment, and I will try to help.

I found the book “FreeBSD Mastery Jails” by Michael W. Lucas to be very helpful for learning about jails. Don’t forget the manpages!

Posted in Uncategorized | Tagged , , , , , , , , , , , , | Leave a comment

FreeBSD 13 on Raspberry Pi Hangs at First Reboot After Install

I have been putting FreeBSD on a couple of Raspberry Pis. One was an old Raspberry Pi Model B (256M of RAM– the first one released). The other was a newer RPI 3B. On the RPI3B I had a 64GB MicroSD card.

I burned the FreeBSD 13.0 disk img with Etcher and it booted up fine. The install process went pretty seamlessly until the first reboot. Then the Pi would hang up right after it showed the Ethernet MAC address:

miibus0: on smsc0 
smscphy0: PHY 1 on miibus0 
smscphy0: 10baseT, 10baseT-FDX, 100baseTX, 100baseTX-FDX, auto 
ue0: on smsc0 
ue0: Ethernet address: b8:27:eb:xx:xx:xx

The PI would just sit there with no error message. I re-did the install a couple of times, tried a different SD card, etc. Eventually, I decided to try FreeBSD 12 instead. This one got to the same place, but then eventually dropped into a mountroot prompt.

At this point I knew it had something to do with the root filesystem not working right. I tried to manually load the root filesystem from the mountroot prompt, but it still would not work.

I had an inkling in the back of my mind that this likely had something to do with growfs, the program that gets run on boot in order to expand the size of the root partition to the size of the entire SD card. After all, in my testing I had tried a couple of times where all I did was install FreeBSD, login as root and reboot immediately.

gorwfs is run automatically from the line in /etc/rc.conf

growfs_enable="YES"

I needed to turn this off on the SD card image. So on another FreeBSD machine I unxzipped the Raspberry Pi img:

unxz FreeBSD-13.0-RELEASE-arm64-aarch64-RPI.img.xz

Next I needed to link the img file to a virtual device so I could mount it:

# mdconfig -a -t vnode -f FreeBSD-13.0-RELEASE-arm64-aarch64-RPI.img -u 0

And then mount it– note that the root partition is partition 2, and you can find it at /dev/md0s2a

# mount /dev/md0s2a /mnt

Then I had to disable growfs in /mnt/etc/rc.conf using sed (or a text editor).

# sed -ibkp 's/growfs_enable="YES"/growfs_enable="NO"/' rc.conf

Unmount and disable the mdconfig:

umount /mnt
mdconfig -d -u 0

After this surgery to the img file you can re-flash the SD card and when you run the installer your root filesystem will not be auto expanded, and your install will not hang after the first reboot.

I am not yet sure what the underlying issue is. I tried manually resizing the partition on the SD card to 32 GB and 16GB and 8GB, and all would not boot. It may be a 4GB limit (which is odd since this is arm64 bit).

In my case I ended up moving the root filesystem to a USB drive anyway. So I did not worry too much about all the wasted space on the SD card. I suppose you could also create another partition and and mount it someplace like /home.

This should at least get you started with the Raspberry Pi 3B on FreeBSD 13 or FreeBSD 12. This bug should be reported, though. I hope to soon, but likely should do some more testing first. Feel free to report it!

Posted in Uncategorized | Tagged , , , , , , , , , , , | 2 Comments